Wednesday, December 18, 2013

Super Easy Candy Cane Hearts

So let's face it, it's supposed to be the most wonderful time of the year, but it's hard to find the time to sit back and enjoy the season with all of the baking and shopping and decorating?  Here's a quickie sweet treat that I made with the kiddos.  They're super fast to make and super adorable (because they're hearts).

What you need:
Mini Candy Canes
Chocolates or Melting Candies
Sprinkles
Wax Paper

Step One: Unwrap the candy canes (ok, so this part is a little time consuming)
Step Two: Place them into a heart shape on a piece of wax paper.
Step Three:  Melt your chocolates in the microwave.  Be careful not burn!
Step Four: Fill the hearts and add sprinkles if you want.  Let them cool.


Serve them on a plate or wrap them in Christmas cellophane bags


Wednesday, November 27, 2013

Raw Cranberry Apple Relish


Raw Cranberry Apple Relish
Serves 6-8

12 Oz Fresh Cranberries
1 Small Orange, Seedless
1 T Fresh Ginger
1 Apple
3 T Sugar, or to Desired Sweetness
1 t Cinnamon

In a food processor, chop up the whole orange and ginger until pureed.  Pour it into a bowl.  Process the apple and cranberries to a rough chop.  Add everything together.  Let it marinate for at least 4 hours, Serve!

Monday, November 25, 2013

Pumpkin White Chocolate Cocoa

Pumpkin White Chocolate Cocoa
Makes 2 Cups

1 C Whole Milk or Heavy Cream
¾ C White Chocolate Chips
2t Cocoa Powder
½ C Pumpkin Puree
Dash of Vanilla
Pinch of Each, Cinnamon, Nutmeg, Ginger
*Optional Whipped Cream and Cinnamon Garnish


Over low heat, whisk together the chocolate, milk, and cocoa together. Once melted, bring to just a boil and add the remaining ingredients.

Serve topped with whipped cream and cinnamon.

Pumpkin Truffles


Pumpkin Truffles
Makes 18-24

1 C White Chocolate plus 3 C for Dipping
2/3 C Ground Gingersnap Cookies plus 1/3 C for Sprinkling on Top
2/3 C Pure Pumpkin Puree
1 ½ T Maple Syrup
1 Orange, Zest Only
4 Oz Softened Cream Cheese
½ t Cinnamon
Pinch Nutmeg
 
Melt 1 cup of white chocolate over a double boiler water bath.  *You can try the microwave, but white chocolate can be temperamental and needs to be watched. Add everything else except reserve the 3 cups of white chocolate and 1/3 cup of cookie crumbles.


Chill them for about 1 ½ hours.  Using an ice cream scoop or teaspoon, portion out the truffles.  Put them onto a wax paper lines sheet tray and freeze for at least 30 minutes.

Melt the remaining white chocolate over a double boiler.  Line a sheet pan with wax paper. The truffles are a little soft, so rather than dip them into the chocolate, set it on a fork and spoon the chocolate over the top. It’s hard to coat the bottom of the truffles, so you may want to spoon a small dot of chocolate on the paper. Then put a coated truffle on top of each dot.  Sprinkle them with gingersnap crumbles and chill until ready to eat.

*Almond Bark may be easier for dipping than the white chocolate.


Wednesday, October 30, 2013

Pumpkin Gingerbread Smoothie

This smoothie recipe is so yummy!  I made it today and totally wanted another one later in the day.  I restrained myself though. This recipe requires a little preparation ahead of time, but it's worth it. What's really awesome is that this is a pretty healthy treat! I would recommend soaking the oats in almond milk the night before, but you can soak them for a minimum of an hour if you don't have the time.  There are many kind of oats.  Steel cut oats would be most popular.  I've found barley oats and quinoa flakes at stores like Whole Foods Market.  These work well too. In the recipe it also requires the banana to be frozen.  If you break it into about 5 pieces and freeze it, you can do this an hour ahead of time also.  Ice can be added too if the banana isn't frozen.


Pumpkin Gingerbread Smoothie
Makes 1 Large Smoothie

1 C Unsweetened Almond Milk
1/3 C Oats
1 Banana, Frozen & Chunked
1/2 C Pure Organic Canned Pumpkin
1 T Molasses
1/4 C Dried Cranberries
1/2 t Ground Cinnamon
1/2 t Ground Ginger
1/4 t Ground Nutmeg
Dash of Vanilla

Soak the oats in the almond milk for a few hours or overnight.

In a blender or with a handheld stick blender (that's my favorite), mix all of the ingredients together and blend until smooth.

Enjoy!

Saturday, October 19, 2013

The Ouija Board : Communication with the Dead!

Have you ever used a Ouija board? Do you believe in the occult?


Many people have tried it out when they were kids. In my case, it was at slumber parties. I remember thinking that it might be real, but is it really?  Ouija boards were created in the mid 1800's when spiritualism and channeling the dead were a trend.  This parlor game later gained its highest popularity between 1920-1960.  "Ouija" was a combination of the word "yes" in French and German. The board is typically wooden or wood looking and it contains letters, numbers, "yes", "no" and "good bye".  The players put their fingers on a planchette which is a movable indicator.  In seance fashion, you ask the Ouija board a question and the spirit spells out a message.  In my case, the question usually involved a boy, but you can ask it a more serious question. 


So does the planchette really glide over the board under the direction of the dead?  Could it really be supernatural forces trying to communicate to us?  Or is it just the power of suggestion or nervous energy? We may never know.....

Partake in a little spooky fun and try out this virtual Ouija Board
http://www.museumoftalkingboards.com/WebOuija.html

Sunday, September 22, 2013

Carrot Soup with Kale, Fig, & Ricotta Filled Ravioli


Fresh pasta is so delicious, especially when making ravioli. It's actually quite easy. There are so many options for filling a ravioli or tortellini. For regular pasta like fettuccine or linguine you can also add other ingredients like sun dried tomatoes, herbs, garlic, or spinach. When I was around 16 years old I asked for a pasta maker for Christmas. I had never made fresh pasta before, but I was determined. The reason I'm telling you this is because even a 16 year old can make fresh pasta. All you need is a little time and patience. I'm going to show you some basic pasta making techniques for you to try at home. If you've really got some big muscles, you can roll this out by hand, however I strongly recommend using a pasta maker. The dough needs to be super thin.

This Recipe in Entirety Serves 4-6 People

Kale, Fig & Ricotta Ravioli Filling
4 Large Leaves of Kale
15 Oz Package of Ricotta Cheese
6 Dried Figs, Chopped
Pinch of Cayenne Pepper
Salt to Taste
1/2 t Nutmeg

Wash the kale and pull the stems apart from the leaves. Roughly chop this into relatively small pieces. Add about 3T water to a large saute pan and steam saute the kale until the water is gone and the kale is fully cooked, but still green. 


Add in the remaining ingredients and adjust the seasonings if necessary.  Set it aside to cool.


Basic Pasta Dough
1 1/2 C Flour
1/2 t Salt
3 Egg Yolks
2 1/2 T Olive Oil
1/3 C Water (to start)

The traditional method is to put the flour and salt onto your work surface or large bowl.  Make a hole in the center, and put the eggs, oil, and water in the middle.  With a fork, start to stir from the center and slowly add in the flour as you pick it up from the sides.  Once it starts to reach dough form, knead it the rest of the way with your hands.  If it's too dry, add small amounts of water to reach a firm dough consistency.  Tear the dough ball in half and reform the balls.  Dust them in a little flour.  Cover one of them in plastic wrap so that it doesn't dry out while you use the other one.


Another method is to just stick it all into the food processor and press Start. I like the more authentic method better myself, but you can decide. 

Depending on what kind of pasta your making, the methods can vary at this point. You'll want to have all of your prep done by this time so that you can go right into rolling the dough out. I'm going to give you some general instructions.  Since there are many brands of pasta makers, I can't give you an exact method. 

Flatten the ball into somewhat of  rectangular shape and squeeze it into the maker while cranking it through.  The first run may be a little funky, that's ok!  Keep running it through, 2-3 more times.  It will eventually even out.  Continue this process going through all of the settings.  Usually there are 3 settings.  As you continue tho run them through, you really need to stretch out those arms and be somewhat graceful.  You may want a partner for this part. 


If you're making a pasta like linguine, you'll have an attachment that you'll run the dough through. I would reflour the dough before you run it through.  For ravioli, like the ones that we're making, you can just put the dough onto a lightly floured cutting board or directly into a ravioli press.


Make an assembly line. Cut the pasta dough with a circle cutter and add about 2 teaspoons of filling to the middle of each one. Get a small bowl of warm water and dip your finger into it. Move your finger around the outer edges and then place a blank pasta circle on top.  Press down the edges to "glue" the sides together. Use a little pressure to seal them so that they don't pop open while cooking. 


Cook them immediately or put them onto flour dusted parchment or wax paper.  Make sure that they're not touching or they will possibly stick together. You can make them up to one day ahead.

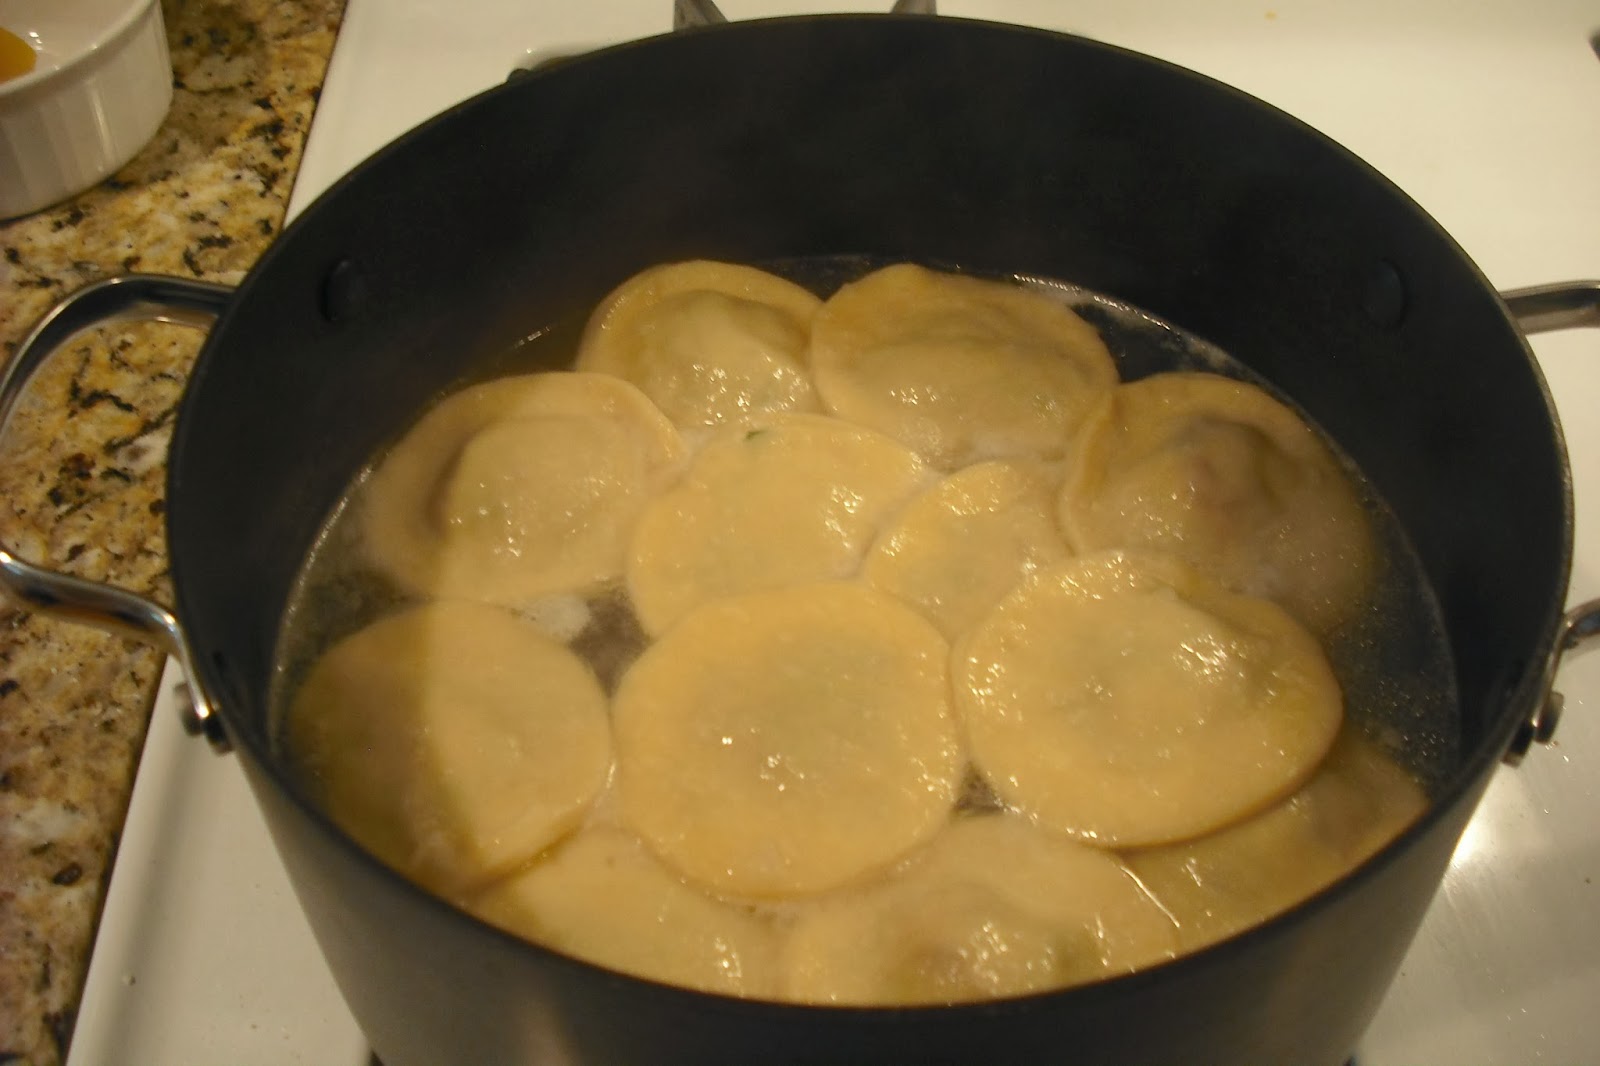
When ready, boil them in lightly salted water for about 5 minutes or until they float.  You can always taste test one before straining it.


*these would also be great with a brown butter or Alfredo sauce


Orange Carrot Soup
1 Lb Carrots, Peeled & Small Diced
1/4 C Yellow Onion, Small Diced
1/2 t Nutmeg
1T Butter
3 C Vegetable Stock
3 T Brandy
1 Medium Orange, Juiced & Zested
Salt to Taste
1/2 C Pistachios, Chopped
Fresh Basil or Parsley (optional garnish)

Saute the carrots and onion in butter until soft.  Deglaze the pot with the brandy (deglaze- adding  liquid to a sauteed item at the end of cooking releases the caramelizaton left on the pan).  Add the remaining ingredients and simmer for 30 minutes to an hour. 


I happen to have a stick blender, so I can blend it right in the pot.  You can also use a blender or food processor. Adjust seasonings if necessary.


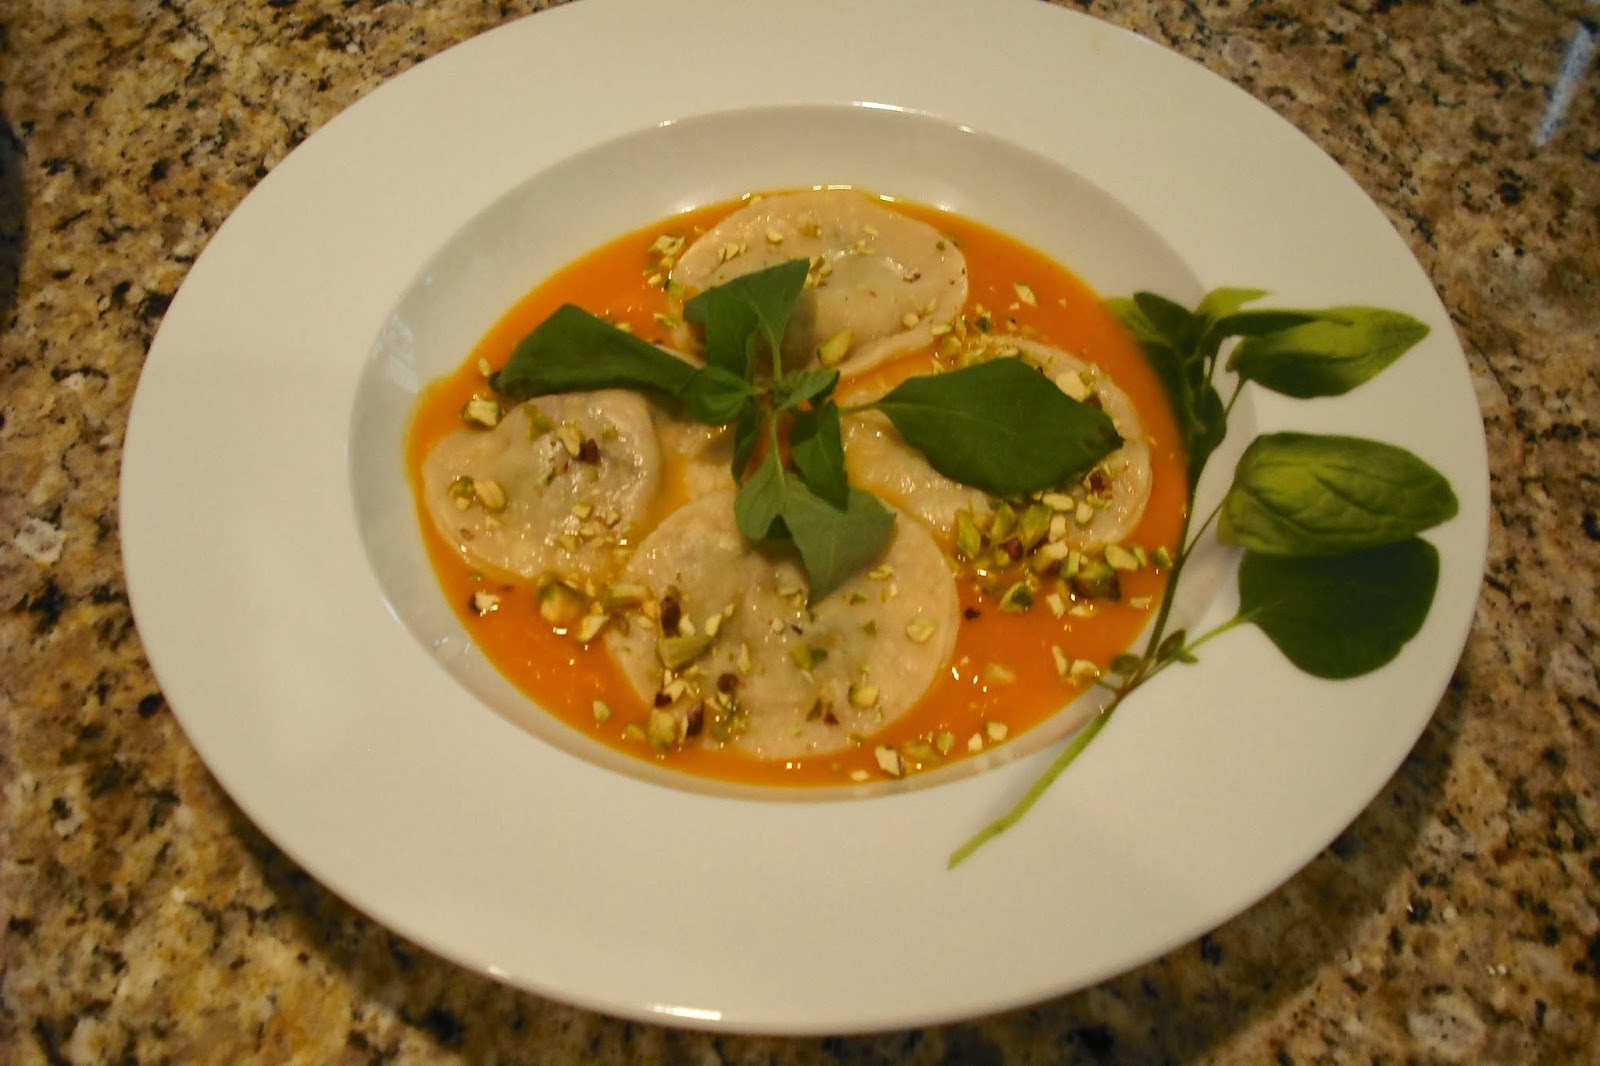
Pour the soup into the bowls.  Add the ravioli's on top and garnish with pistachios and basil.

Monday, September 9, 2013

Cucumber Mint Sangria


Cucumber Mint Sangria

Makes 1 Large Pitcher

1 Cucumber, Small Dice
3 Cups White Grape Juice or White Juice Blend
5-6 Sprigs of Mint
1 Bottle of Riesling or Pinot Grigio
½ C Triple Sec
½ C Brandy


Stir all together.  Marinate for 6-8 hours for a stronger cucumber flavor. 

Sunday, September 1, 2013

Bacon Pecan Banana Split


You read that correctly, my friends.  I love a little bacon in my desserts so I figured, why not a banana split? I wrote the recipe below for 1 serving only, to make it easier to adapt for more people.  I hope that you enjoy!

Bacon Pecan Banana Split
Serves 1

2-3 Scoops of Vanilla Ice Cream
2 Slices of Cooked Bacon, Lightly Crumbled
1 Banana, Cut Longways
1T Chopped Pecans
1 T Maple Syrup

Scoop the ice cream into the middle of the bowl with the bananas around the edges.  Sprinkle pecans on top and drizzle with maple syrup.

Tuesday, August 6, 2013

Healthy Vegan Cookies & Bars


Eww... Vegan??? Healthy???......Don’t be afraid! These cookies are made without any dairy, granulated sugar or oil but are still somehow super delicious.  They’re guilt free and also freeze well so you can pull them out when you’re craving something sweet.


Banana Oat Breakfast Cookies
Makes 25-30 Cookies

2 Bananas
1 C Chopped Walnuts or Pecans
1 T Vanilla
2 C Rolled Oats
1 Orange, Zested and Juiced
1 t Baking Soda
½ t Cinnamon
1 C Raisins
½ C Chopped Dried Apricots
½ C Dried Cranberries

Preheat the oven to 350 degrees.

Mush the bananas with a fork. Add the remaining ingredients until well blended.

Line a cookie sheet with parchment paper. Scoop out the cookies with about an inch between each other.  A small ice cream scoop works best.  Bake for about 10-12 minutes. 

*I happened to find quinoa flakes at Whole Foods Market and was able to substitute 1 cup of them for 1 cup of the oats. This is a great option if you’re able to find them.


No Bake PB & J Bars

1 ½ C Non-salted Peanuts
1 ½ C Rolled Oats
1 C Dried Dates
Warm Water
10 Oz No Sugar Added Jam

Blend the peanuts, dates, and about 2T warm water in a food processor.  It should be like a little moist, like a paste, so you may need to add a few more tablespoons of water.

Spread all but about ½ cup into a small pan and press down firmly.  Evenly spread the jam over the top.  Sprinkle the remaining peanut mixture over the top.  Let it set in the refrigerator for about an hour.  Cut and serve.


Sweet Potato Pecan Cookies
Makes 25-30 Cookies

2 C Pecans
½ C Rolled Oats
1 C Whole Wheat Flour
1 t Baking Soda
½ t Cinnamon
½ t Ground Ginger
¼ t Nutmeg
1 C Canned Sweet Potato (or Pumpkin if you can’t find it)
1 Orange, Zested and Juiced
1 T Vanilla
1 C Raisins 

Preheat the oven to 350 degrees.

Grind pecans and dates in a food processor.  Put into a bowl and mix remaining dry ingredients in with it. Add remaining ingredients together.
 
Line a cookie sheet with parchment paper. Scoop out the cookies with about an inch between each other.  A small ice cream scoop works best.  Bake for about 15-18 minutes.


As some of you my know, I have a rabbit. Well, these are a treat that I also get to share with her because they're animal friendly. We like to share fruits & veggies, so these cookies are a nice change. Try them with your pet too!
 

Thursday, July 25, 2013

Fresh Corn & Mango Salad

This recipe uses raw corn.  Fresh summer corn is super sweet and doesn’t need to be cooked.


Fresh Corn & Mango Salad
Serves 3-4

3 Ears Fresh Corn
1 Mango, Chopped
8 Radishes, Sliced              
½ Bunch Cilantro, Chopped
1 Jalapeno, Minced
3 Limes, Juiced & Zested
½ Cup Red Onion, Diced
1 ½ T Cider Vinegar


Shuck the corn and rinse it under cold water, removing all of the husk strings.  Rip off the stem, and with the stem side on the cutting board, cut off the kernels.  Add the remaining ingredients and serve cold.

Monday, July 8, 2013

Quick Fresh Summer Fruit Dessert

This dessert is so simple but very elegant and refreshing. Use the freshest berries or stone fruit of the season. Add Frangelico, Brandy, or Triple Sec and a little sugar if needed.  This is great on its own or on top of ice cream, sorbet, and pound or angel food cakes. It’s best if it can marinate for at least 30 minutes and when served the day that it was made.

For Each Cup:
1 C Fresh Assorted Berries
2 T Frangelico Liqueur
Mint Garnish (optional)
 
Or

2 Apricots, Sliced
3-4 Strawberries, Sliced
1 T Brandy
1 T Triple Sec Liqueur
Mint Garnish (optional)


Tuesday, July 2, 2013

Patriotic Candy Fireworks


What You Need:
Paper towel or toilet paper tubes
Patriotic scrap paper and card stock
Tissue paper
Craft glue        
Pipe cleaners or other wire decoration
Red, white and blue style wrapped candy
Optional: stickers, ribbon, etc.


Cut down your paper rolls if needed.  Using your rolls, cut and measure the paper to fit.  Glue it around the tube. Get creative and decorate the tubes.  I cut out long strips of paper from what I already had, but you can also use stickers, ribbons, etc.
 

Cut 2 rectangles of tissue paper, about 8 inches by 6 inches.  Lightly glue the 2 pieces together long the 8 inch side. Glue again, long that same side, and carefully roll it together  inside the paper roll.  Let it dry.


For TNT style fireworks: Cut a square piece out of the card stock.  Glue it to the bottom, which is the opposite side of the tissue paper.
For cone topped fireworks: Cut about a 4 inch in diameter circle out of card stock.  Cut a slit on one side, half of the way in.  Put a little glue next to the slit in a small triangle pattern (see picture below).  Pull the nonglued side over the glue side to create a cone.  If this is confusing, practice moving it over before you glue it.  Let it dry.  Glue the cone onto the opposite side of the tissue paper. I find that thick craft glue works best for this part.  Let it dry.


Fill the tubes with candy.  I recommend wrapped candy and keeping them inside the house.  Think about the time of year that you’re making these.  You don’t want the candy out melting in the hot summer sun.  Tie the ends with the decorative wire. Use them as a table decoration and then later as party favors! 


Have a Happy Independence Day!